Usage
Setup
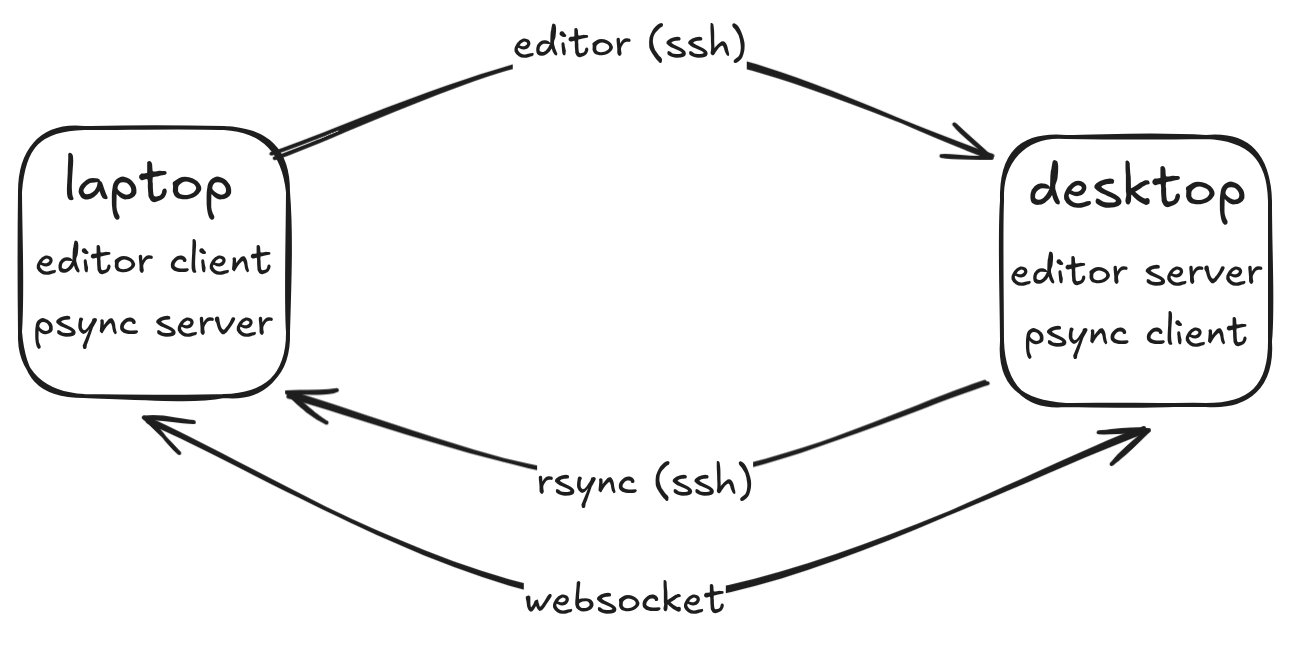
You will need to be able to reciprocally SSH into your target machines. The below describes my setup, though you can set it up however you’d like.
The network should be secure. Psync messages are unencrypted, so I recommend that you do not expose your psync ports over the WAN, and if you do, you should only do so over a secure tunnel like zerotier.
Server
It is recommend to run the server in a docker container. This improves security by isolating binaries and improves ease of setup. You can run the server manually, or the server can be set up to run as a daemon on Linux with a simple systemd service.
Docker setup
First, create a directory for your docker-compose file, for example at
/opt/psync. This can be done as follows:
# make the dir, create the compose file
sudo mkdir /opt/psync
sudo touch docker-compose.yml

# optional: add psync user
sudo useradd -Ms /usr/sbin/nologin psync
sudo chown psync /opt/psync
sudo chmod g+rw /opt/psync
sudo usermod -aG psync $(whoami)
newgrp psync
Then, generate your self-signed SSL certificate. Be sure to replace $MY_IP.
cd /opt/psync #or wherever
# Generate a public/private keypair
openssl req -x509 -newkey rsa:4096 \
    -keyout key.pem -out cert.pem \
    -sha256 -days 3650 -nodes \
    -subj "/C=XX/ST=StateName/L=CityName/O=CompanyName/OU=CompanySectionName/CN=$MY_IP" \
    -addext "subjectAltName=DNS:localhost,DNS:psync-server,IP:127.0.0.1,IP:$MY_IP"
Configure your docker container at opt/psync/docker-compose.yml.
---
services:
    psync-server:
        image: ghcr.io/ada-x64/psync-server
        container_name: psync-server
        ports:
            - "5000:5000" # expose the psync websocket server
            - "5022:22" # expose the SSH server
        environment:
            # Required to accept connections from your client machine
            # I recommend allowing localhost / 127.0.0.1 here for testing
            - PSYNC_ORIGINS="client.ip.1 client.ip.2"
        volumes:
            - ./cert.pem:/app/cert.pem:ro
            - ./key.pem:/app/key.pem:ro
            - ~/.ssh/authorized_keys:/app/authorized_keys.src:ro
Importantly, the SSH server is set up to only accept authorized keys. This should be your default anyways. Follow any guide to set up your SSH keys and SSH server; this will automatically copy the authorized keys to the docker container. Here’s a simple way to do this:
# It's best to provide a password when prompted.
# You can avoid the hassle of typing it every time with `ssh-agent`.
ssh-keygen -C psync -f ~/.ssh/psync.id_ed25519
cat ~/.ssh/psync.id_ed25519 > ~/.ssh/authorized_keys
Be sure to keep track of the private key. You’ll need to use this key every time you connect.
Refer to the server documentation for environment configuration.
Daemon setup
Next, create a systemd configuration file. I recommend storing this at
etc/systemd/user so it runs on when the user session starts. Additionally, you should
create a new user with minimal permissions to run the service.
/etc/systemd/user/psync.service
[Unit]
Description=Psync Daemon
After=network-online.target
Wants=network-online.target

[Service]
Restart=on-failure
RestartSec=1

ExecStart=/usr/bin/docker compose -f /opt/psync/docker-compose.yml up
WorkingDirectory=/opt/psync

# You may need to relax these restrictions
ProtectSystem=full
PrivateTmp=true
NoNewPrivileges=true

[Install]
WantedBy=default.target
Next, run systemctl --user start psync; systemctl --user enable psync. It’s
useful to run journalctl --user -fu psync to verify the system status.
Graphical Server
In addition to CLI-based projects, psync supports graphical setups. Here is an
example of how to use the psync-graphical-server docker container.
services:
    psync-server:
        image: ghcr.io/ada-x64/psync-graphical-server
        container_name: psync-server
        ports:
            - "5000:5000"
            - "5022:5022"
        environment:
            - "PSYNC_ORIGINS=${MY_ORIGINS} 127.0.0.1 localhost"
            # These are needed in order to set up an X / wayland server.
            # You should double-check the values of these environment variables.
            - "XDG_RUNTIME_DIR=${XDG_RUNTIME_DIR:-/run/user/1000}"
            - "WAYLAND_DISPLAY=${WAYLAND_DISPLAY:-wayland-0}"
            - "XDG_SESSION_TYPE=wayland"
        volumes:
            - ./cert.pem:/app/cert.pem:ro
            - ./key.pem:/app/key.pem:ro
            - /home/ada/.ssh/authorized_keys:/app/authorized_keys.src:ro
            # Sync the wayland session.
            - "${XDG_RUNTIME_DIR}/${WAYLAND_DISPLAY}:${XDG_RUNTIME_DIR}/${WAYLAND_DISPLAY}"
            #  You may need to do this manually when setting up a systemd daemon.
            # - /run/user/1000:/run/user/1000
        group_add:
            # Give psync access to your gpu.
            # You may also need to add group `render`.
            - video
        devices:
            # Sync your sound and graphics devices.
            - /dev/snd:/dev/snd
            - /dev/dri:/dev/dri
For more advice on how to set up an X11/Wayland accessible Docker container, see the x11docker wiki
Client
The client is intended to be invoked as a CLI script. First, you will need to install it. Use your favorite package manager. I use uv.
uv tool install cubething_psync
Then, you should be able to access it from the command line.
psync --help
Refer to the help command and the api docs for more details.
You will need to manually add a certificate to trust the server. Copy the
certificate you generated for the server to your client machine at
~/.local/share/psync. If you want to use a different directory, set it using
the PSYNC_CERT_PATH environment variable.
I also recommend placing your PSYNC_CLIENT_IP (etc.) in ~/.profile.